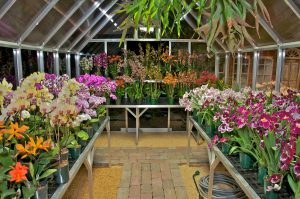
A well-planned and well-built greenhouse will give you a lifetime of gardening enjoyment. Grow organic fruits and vegetables, start your seedlings early, overwinter your tropical plants, and enjoy your favorite hobby all year long. Consider these important factors when planning for your perfect greenhouse.
Where is the best location for my new greenhouse? Do I want it attached to my home or freestanding in a garden setting? What are the advantages (and costs) of glass versus polycarbonate glazing? How will I heat my greenhouse in winter and keep it cool in summer? Do I need a foundation and permits? All these great questions and more are answered by experienced horticulturists to help make sure your greenhouse plans are successful.
Step 1:
Attached to Your Home or Freestanding?
Perhaps the first decision you should consider is if you want your new greenhouse attached to your home or freestanding in a garden setting. Attached greenhouses typically have more convenient access without going outside, and are more energy efficient because one wall is already heated by your home. They do however, require a frost-free footer and foundation, which can add significant costs to the project.
Freestanding greenhouses typically have more flexibility in size and shape, and can be beautiful in a landscaped garden area. They also benefit from having more light coming in from all four sides and their foundations are typically lower in cost. Building permits are usually less stringent for freestanding greenhouses since they are considered an “accessory building.” Local Zoning permits often require a side yard and rear yard setback of 10 – 15 ft.

Lean-to Attached Greenhouse

Freestanding Evenspan Greenhouse
Step 2:
Locating Your Greenhouse
One of the most common misconceptions about a residential greenhouse is that it needs to be located where it will get full sun exposure. While this may be important for commercial production greenhouses, it is not necessary for most residential greenhouses. In fact, full southern exposure will require shade cloth to keep the greenhouse cool in summer. We like to say, “West is Best” and “East is Easy.” Only a northern exposure in not ideal for your greenhouse location because it is too shady for many tropical and vegetable plants.

Step 3:
Structural Design & Integrity are Important
We recommend only a strong extruded aluminum frame that meets the snowload and windload requirements of your area. Welded aluminum truss designs are the strongest. There are many low-cost aluminum greenhouse kits that are made from flimsy stamped aluminum and they do not have the quality to hold up in all weather conditions – be careful. Galvanized metal frames will rust in a few years and wood frames are pretty, but require extra maintenance and begin rotting after a few years.
Modern engineering has enabled improvements in greenhouse designs. Look for full-length glass panels that eliminate traditional overlaps and gaps. New 3-wall and 5-wall polycarbonate panels are unbreakable with excellent R-value insulating properties. EPDM rubber seals provide energy-efficient air-tight seals, and extruded aluminum h-channel designs hold panels better than old-fashioned clips and metal straps. New improved silicon sealants are warranted 50 year. Take time to evaluate the engineering integrity of your new greenhouse and know that a high-quality extruded aluminum frame will last a lifetime.

Welded Truss Frame

Square Tube Frame with h-channel
Step 4:
Size it for Optimum Utilization of Space
Spend some time thinking about how you plan to use your greenhouse. Do you want the maximum amount of bench growing space? Do you have large plants that need a dedicated area without benches? Do you want a sitting area for your own peace and serenity?
Greenhouses with a single aisle down the center are typically 8, 10 or 12 feet wide. 10 ft. widths offer the most efficient utilization of bench space because you can put 3 ft. wide benches on both sides and have a 3-4 ft, wide aisle with room for plant to overgrow the benches. 12 ft. wide is more common for larger plants that need extra room to grow. If you want to have two aisles with benches around the perimeter and a large growing area in the middle, we recommend a 20 ft. width.

12 ft. Wide

10 ft. Wide
Planning Tip:
It costs more to add width than length because the wider clearspan trusses require heavier aluminum material.
Common widths and lengths include:
– 8 x 12, 10 x 16, 10 x 20, 12 x 24, 20 x 40
– Custom sizes to fit your home are worth the investment
Most standard benches are 3 ft. deep x any length, and 32 inches high.
Step 5:
Foundation Requirements
Any greenhouse that is attached to your home or garage will require a frost-free footer and foundation so that frost in the ground does not allow the greenhouse to move separately from the permanent structure. This requires excavation and concrete work that will add cost to the installation.
Most smaller freestanding greenhouses can be built on a concrete pad. Some glass or polycarbonate models less than 10 x 16 can be installed on a pressure treated wood frame if it is in a well-drained location. Brick and stone kneewall options are popular because they can be beautiful and are more energy efficient. These kneewalls will require a minimum of 12 in. x 12 in. footer; some will require more.

12” x 12” Surface Footer Required

4” x 6” Treated Lumber Base

Retaining Wall Blocks Make an Economical Kneewall
Planning Tip:
Concrete floors are easier to keep clean.
Gravel floors help retain natural humidity.
Step 6:
Glazing Options – Glass vs. Polycarbonate
There are good reasons to choose both glass and polycarbonate as your preferred glazing option. Glass is beautiful and lasts a lifetime. Polycarbonate is unbreakable, less expensive and more energy efficient.
Advantages of Glass
– Beautiful clear view
– Maximum light transmission
– Single-pane glass is cost-effective
Advantages of Polycarbonate
– 200 times stronger than glass
– 3-wall and 5-wall designs are energy efficient
– Tinted polycarbonate on the roof eliminates the need for shade cloth
– Clear polycarbonate diffuses light and prevents burning
Disadvantages of Glass
– Double-pane glass is expensive
– Requires Low-E or shade cloth to prevent overheating
Disadvantages of Polycarbonate
– Does not look as nice as glass
– Warranted for 10 years and typically lasts 15 – 20 years, but will eventually need to be replaced

8mm Triple-wall and 16mm 5-wall Polycarbonate

h-channel and EPDM Rubber Seal for Glass

Polycarbonate Greenhouses Diffuse the Light Better than Glass
Planning Tip
Consider a combination of glass sidewalls for appearance and polycarbonate roof for energy efficiency with built-in shading.
Step 7:
Heating Systems
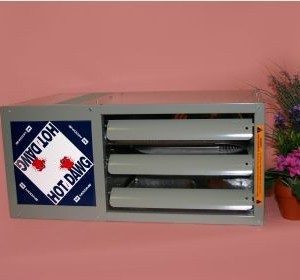
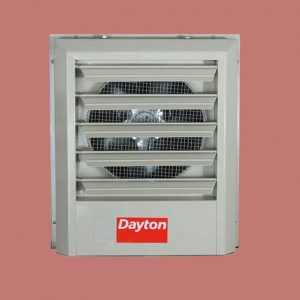
If you plan to grow plants all year round you’ll want to have a heater to keep your greenhouse warm on those cold winter nights. Small electric heaters are popular in greenhouses 10 x20 or smaller, while gas heaters are popular in larger greenhouses. 240V electric heaters are 100 percent energy efficient while propane or natural gas heaters are 80% efficient. Gas heaters require a fresh air intake and exhaust so you will have a 3-4 inch hole in your greenhouse. Radiant floor heat is an excellent option if available.

Gas Heaters are 80% Efficient and Require an Exhaust Flue

240V Electric Heaters are 100% Efficient
Planning Tip
Some orchid blooms are sensitive to minute levels of ethylene gas emitted from open flame gas heaters.
Popular blue-flame gas heaters are not recommended because they have a low-oxygen sensor that shuts them off when oxygen levels get low, which can happen in an air-tight greenhouse.
Step 8:
Ventilation Systems
Proper ventilation is perhaps the most important option for your new greenhouse. Traditional roof-mounted ridge vents offer passive cooling, but there are more efficient options. A powered ventilation system with motorized intake shutter and exhaust fan will keep your greenhouse 10 degrees cooler and is designed to turn over the volume of air inside the greenhouse in less than 2 minutes.
Circulation fans are important to maintain air movement 24/7, which helps prevent bacterial and fungal infections.

Thermostatically Controlled Exhaust Fan and Intake Shutter in Gable Peaks, with Circulating Fan in Corner
Step 9:
Greenhouse Equipment & Accessories
You’ll want to consider some valuable options and accessories to optimize your growing experience. Grow lights are not usually needed for supplemental light, but they are helpful to extend the day length for optimum growing and flowering conditions during the shorter days of winter. Your vegetables and blooming plants typically require 12 to 16 hours of daylight.
T5 fluorescent grow lights are the most popular and cost effective. Bulbs are available in the daylight spectrum (cool/blue) for best vegetative growth, and in the warm spectrum (red) for best flowering conditions. New LED grow lights, metal halide lights (cool), and high-pressure sodium lights (warm) are also available for more precise lighting conditions.
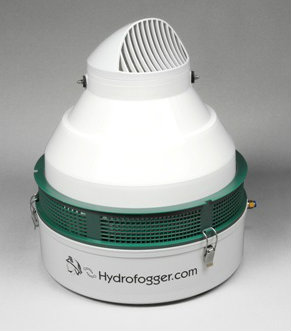
Humidification systems are available as benchtop hydrofoggers or mist systems that can be controlled with a humidistat to maintain precise humidity in your greenhouse. The foggers are preferred in residential greenhouses because they emit a very fine mist that often evaporates before landing on the plants. Misters work well but they make everything in the greenhouse wet.
Automated watering systems are available to accommodate vacation schedules and long periods away from the greenhouse. Dribble tube systems release a timed amount of water to individual plants on a regular schedule and work very well. Overhead misting/watering systems are another option.
Planning Tip
Your new greenhouse will get hot in the summer and requires some form of shading and/or evaporative cooling. Aluminet shade cloth works well hanging on the inside of glass walls facing south and west. 50% to 60% shade value is recommended. Evaporative coolers come in all sizes with some models fitting underneath a bench and high-powered systems sitting outside the greenhouse like an AC unit.

T5 Grow Lights Produce 5000 Lumens Per Bulb

Benchtop HydroFoggers Humidify 300 sq. ft.

Dribble Tube Watering Systems are Reliable
Step 10:
Architectural Design Enhancements
Greenhouses can be functional and beautiful at the same time. Consider customizing your greenhouse with minor modifications and trim options to complement the architecture of your home. Cresting and Finials along the peak of the roof add a classic Victorian style. Changing the pitch of the roof to match your home helps it blend in. Add a stone or brick kneewall for additional accent and beauty. Consider stained glass accent pieces for a truly unique design.

Custom Pitch Roof with Stone Kneewall

Good Landscaping Makes a Greenhouse Part of Your Home

Curved Eave Options


